Inspiration Point
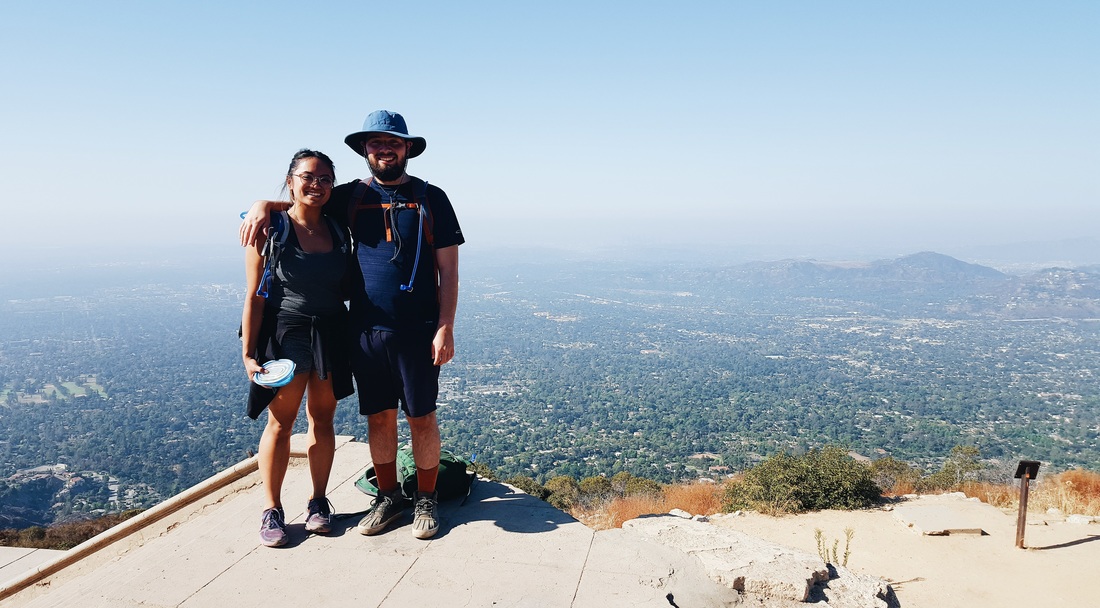
Inspiration Point is located in Altadena, CA. It can be accessed via Cobb Estate where you can park on the residential streets and follow the trail signs. Access to a map via LA Trail Hikers can be viewed HERE. My boyfriend wanted to go hiking today and decided we should complete this hike, since we only made it to Echo Mountain last time. So we headed back up towards Echo Mountain, skipped the viewing there and trudged on towards Inspiration Point. We decided to take the Castle Canyon trail since it was said online that it's much easier and more shaded compared to the Sam Merrill trail going up. The hike from Echo Mountain is about 2.5 miles (one way) on steep incline. The pathways of Castle Canyon can be really narrow at points, but it's manageable. Reaching the top is very rewarding because of the amazing view. We were very sweaty by that point and had to dry our shirts up at the look out area, so I suggest bring an extra shirt! We spent about 45 min at Inspiration Point. After eating our lunch and admiring the view, we headed back down towards Echo Mountain via Sam Merrill Trail. The Sam Merrill trail has some shaded areas, but most of it is open, so if you hiked early in the morning then hoorah! We started our hike at around 8am and finished at around 2pm with sore feet. This hike was fun and challenging, but very rewarding at the top! Also, to note watch out for small rocks because you can accidentally roll your ankle! Thus, high ankle protection is suggested. Please be sure to bring at least 3L of water and snacks/food and other day hike essentials, in case anything happens, you can be the helping hand the someone needs.
Hike: ~10 miles(round trip) Parking: Street Location: Altadena, CA Trailhead: Castle Canyon to Inspiration Point Difficulty: Hard
Hike: ~10 miles(round trip) Parking: Street Location: Altadena, CA Trailhead: Castle Canyon to Inspiration Point Difficulty: Hard


102516
Lava River Cave
The Lava River Cave Located in the Coconino National Forest is approximately 0.75 miles long. It is located 14 miles just north of Flagstaff, AZ. It is a very neat place for spelunking. Directions are located HERE. Driving towards the places requires a lot of maneuvering over potholes and patience with other cars. I was driving my aunt's Honda Fit and was able to make it over the pot holes. Just drive carefully and watch your speed, so as to not ruin your tires! But it seems like a higher raised car would do well over potholes. I've also see someone(the elderly couple pictured below) drive there RV towards the trail head without damage, they just happened to be driving really slow, which I didn't mind. The road towards the area is pretty narrow so I had to drive towards the sides to let a car pass that was trying to avoid the large potholes. Once you reach the trail head, there is a registration box where you can sign in and out to leave your whereabouts information. A few fellow hikers were kind enough to leave head lights inside the box for others to use in the cave, but we didn't end up using them since we had brought our own flashlight. I brought with me a 200V police flashlight and even that wasn't bright enough to illuminate the cave, compared to the one the elderly man had. My mom even scrambled to chase him, so that we had a brighter source of light. Yet, having 3 flashlights were sufficient enough to illuminate our path. Inside the cave is pretty cold, as low as 45 degree Fahrenheit, so dress accordingly!
Important things to bring:
-Really Bright source of light!
- Warm clothing!
Hike: 0.75 mile (one way) Parking: Free Location: Flagstaff, AZ Trailhead: Lava River Cave Difficulty: Easy
Important things to bring:
-Really Bright source of light!
- Warm clothing!
Hike: 0.75 mile (one way) Parking: Free Location: Flagstaff, AZ Trailhead: Lava River Cave Difficulty: Easy


101316
Bright Angel
First visit to the Grand Canyon was really... well... Grand. Bright Angel is one of the many trails that is considered easy-moderate and is heavily trafficked by tourist, runners, and hikers, but mainly hikers. The entrance fee for this National Park is $30 for a single vehicle for one day. Information on where a pass may be purchased and fees can be found HERE. The trail itself is about 17 miles long (one way), so it's not recommended for first timers or amateurs, like myself, to hike the whole distance (round-way) in one day, unless you are camping with experts and have the necessities, especially water and sun protection. This trail was all down hill when descending into the canyon, so be prepared to ascend back up the distances you've hiked. We managed to only hike from the trail head to the first rest house which is 1.5 miles (one way) and is a good turn around for first time hikers into the canyon. This Rest House has a viewing area, toilets, and water available (seasonal). Complete information about the trail may be found HERE. It was difficult at parts for my mom to ascend back up, so good thing I had 3L of water available to share and a bunch of granola bars for snacks. This trail is really spectacular and was very scaring descending for the first time because parts of the trail seemed narrow. This was my first trail that I got scared of because of the height, but I managed. I recommend this hike if you are ever in Arizona because the Grand Canyon really is spectacular and should be on everyone's bucket list!
Hike: ~17 miles (one way) Parking: $30 Location: Sedona, AZ Trailhead: Bright Angel TH Difficulty: Moderately Difficult
Hike: ~17 miles (one way) Parking: $30 Location: Sedona, AZ Trailhead: Bright Angel TH Difficulty: Moderately Difficult


101216
Devil's Bridge
This trail is located in Sedona, Arizona. It was my first trail that I hiked out of the state of California! Sedona is such a beautiful town filled with dozens of trails and vibrant rustic colors! I fell in love with this town! If you get a chance to fly or drive to Arizona, make Sedona one of your stops! Anyways, enough about the town, let's get right to the trail. The Devil's Bridge trail is located in the Coconino National Forest in the Dry Creek Area (North West part of Sedona). There are a variety of parking locations near the trail that don't require a Red Rock parking pass, depending on how long you want to hike. A map of the Red Rock Country with trailheads can be accessed HERE. We parked at the Dry Creek Vista Trailhead. To get to the parking lot, it requires you to drive onto a one lane road. If you are heading up Dry Creek Road, look out for a small sign that says "FR 152C" a.k.a. Fire Road 152C and make a right into that road. It should be posted next to a stop sign on a dirt road. Then follow the signs for the overflow parking lot, unless you have a high clearance vehicle, you may be able to drive closer to the trailhead. We started our hike at around 5 pm and did not leave the trail until around 8 pm. So, if you do decide to hit the trails late, always be prepared and bring a flashlight and other essentials because you never know what can happen. The route we took from the overflow parking lot, takes about 6 miles round trip. I believe we started off at the Chuckwagon trailhead to head towards the Devil's Bridge trailhead and we followed about 2 signs, until there were no more signs and so we just kept following 2 girls that were hiking ahead of us. You can also follow the Vultee Arch road where the Pink Jeep tours drive on to get to the trail head and it's a straight shot from there. Vultee Arch is the easiest way you can reach the trailhead, since the road is wide for Jeeps and there are no small turns to get lost. But the coordinates to the Devil's Bridge trailhead is HERE. Once we reached the trailhead, it was mainly an uphill climb from that point on which includes climbing/crawling up natural made staircases. We then enjoyed the views and took tons of pictures to take home back to LA for safe keeping. As the sun set and we left the Devil's Bridge in darkness, we were able to hear crickets louder than the ones in LA and even see our own shadows from the cast of the moonlight. Even though we left the trailhead with flashlights, we almost got lost trying to find our way back to which we came. Instead we just kept following the dirt road known as Vultee Arch and eventually we found our way back to the parking lot.
Hike: ~6 miles Parking: Free Location: Sedona, AZ Trailhead: Marked signs Difficulty: Moderately Difficult
Hike: ~6 miles Parking: Free Location: Sedona, AZ Trailhead: Marked signs Difficulty: Moderately Difficult


101116
Echo Mountain Resort
The hike to Echo Mountain Resort felt pretty strenuous on a warmer day. We arrived at the location of Cobb Estate and started our hike at around 7:30. We entered the trail head by following the paved road and then headed to the right of the water fountain where there is a marked sign indicating "Trail". Just keep following the signs to Echo Mountain. Then we walked pass an area filled with large cacti on both sides and over what looks like a dried riverbed. There were many switchbacks and the hike to the resort was all at an incline. Very little shade is provided in the beginning and would recommend going on a much cooler day when it's foggy. Hiking through various switchbacks felt like we were never going to reach our destined goal, but once we reached the 2 mile marker on a wooden stump we kept pushing through and we finally made it to Echo Mountain Resort. At the entrance to the resort, there are old ruined parts from a train that would transport people up to the resort. We originally wanted to head to Inspiration point as well and follow Castle Canyon to reach the site, but we started our hike a bit late on a warmer day and our bodies could not handle the heat so we decided to just explore the area and have a little picnic up there. After a little exploration, we headed back down and ran for a few stretches downhill and arrived at my parked car at around 10:45. If you decide to try this hike, I recommend you visit Inspiration Point even though I could not at this time. I will definitely return to this location and push on through to Inspiration Point on a much cooler day! In the mean time, I'm happy I got to go hiking again since it's been a while. Happy trekkings!
Hike: ~5 miles Parking: Free (Lake St.) Location: Altadena Trailhead: Marked signs Difficulty: Medium
Hike: ~5 miles Parking: Free (Lake St.) Location: Altadena Trailhead: Marked signs Difficulty: Medium


Santa Paula Punch Bowls
This trail is hidden and about 1.5 hr drive from LA. My boyfriend, his friends, and I left at 6 am and arrived to the parking location at around 8am. You must park outside the campus of Thomas Aquinas College, right on the roadside or what security called the "highway". We parked inside the campus because we didn't know that we had to park outside and we got lucky that our cars didn't get towed. Parking is free as long as you park outside of the campus. Entrance to the trailhead requires you to walk and enter through the campus gates and follow the paved road up until you see signs directing you to the trail and advising hikers to stay on the paved road. Once we started our hike to the trail, a random spotted dog came running past us with no owner and headed for the trail. During our hike, we noticed he would pace himself until we had caught up with him. We thought he was the most adorable dog ever, yet odd. As we got close enough, we read his dog tag and turns out his name was Rusty; he belonged to the college. It was then that we realized that he was guiding to the punch bowls all along! When we encountered a family when reaching the first bowl, a hiker who had been hiking there since the '80s had said that the dog has guided him and other hikers as well towards the trail. So, if you are reading this and are planning to head up there, please be kind and bring extra water and dog treats for Rusty, if you happen to cross paths.
Hike: 8.5 miles Parking: Free Location: Santa Paula (Los Padres National Forest) Trailhead: Marked signs Difficulty: Med
Hike: 8.5 miles Parking: Free Location: Santa Paula (Los Padres National Forest) Trailhead: Marked signs Difficulty: Med

Trying to find the 2nd Punch bowl.
|

The First Punchbowl.
|


|

|
Wisdom Tree
This trail is located right off of Barham street near Universal Studios Hollywood. Who would've thought there would be this beautiful, yet strenuous trail in the middle of Hollywood Hills and Studio City?! Parking is free on the streets and walking up to the trailhead is quite a warm up since it is all uphill on a winding paved road along houses. Before reaching the trailhead, kind houses are nice enough to leave water bowls out for your pets and advises other hikers to fill it with water, if available. They also leave a notebook and pen to note any encounters of rattlesnakes along the trail and what time. Once you reach the trailhead, the elevation picks up and the only dirt trail becomes steeper and some parts of the trail become narrow, so please be careful when passing fellow hikers. I went through this hike in the summer and it was very hot! There is very little shade and the biggest shade spot you will get from the shadow casted from the Wisdom Tree. I advise bringing at least 2 L of water when experiencing this hike during the hot hours in the summer! Luckily, my boyfriend and I had enough water left after finishing a different trail the same morning beforehand! I do believe this would be a magnificent place to hike during the evening hours as you can watch the sunset.
Hike: 3 miles Parking: Free Location: Cahuenga/ Hollywood Hills Trailhead: No Sign Difficulty: Moderate-Hard
Hike: 3 miles Parking: Free Location: Cahuenga/ Hollywood Hills Trailhead: No Sign Difficulty: Moderate-Hard


|

|

|
Bouquet Falls
This hike is considered more of a stroll as it is adjacent to neighboring home/cabins. If you are in the Santa Clarita Valley, it is a great place to have a picnic and/or to just relax, but watch out for the abundant bush of poison oak! Such a beautiful place, but too bad it contains a lot of graffiti and trash, like any other place dumb and lazy people always like to ruin! To get to the parking area, this is located between fire marker 9.8 - 10.1 and there should be a dirt road that goes down towards a dirt parking spot in front of cabin homes. The trail head starts at the white gate pictured below with a 4 car parking lot that is cemented, the other parking spots on the dirt are reserved for those that live there. You will be able to hear the medium sized waterfall from the parking lot, so finding it isn't too hard, just follow the trail and listen for the waterfall.
Hike: 1.5 miles Parking: Free Location: Santa Clarita Valley Trailhead: No sign Difficulty: Easy
Hike: 1.5 miles Parking: Free Location: Santa Clarita Valley Trailhead: No sign Difficulty: Easy

|

|


|

|
Cave of Munits
This trail is located in the West Hills area of the San Fernando Valley. The trail begins at the El Escorpion Park Trailhead with a pretty large apparent sign. Parking is Free along the street of Vanowen. The hike to the Cave of Munits is a short stroll that doesn't require any climbing before getting to the cave. Finding the cave is a bit difficult at first as it is hard to spot what the cave looks like from afar without doing previous research and finding pictures. The cave will look similar to the eye of Sauron when coming from the trailhead and will be located off to the right. Once you get to the entrance of the cave, it requires a bit of rock climbing and if you slip you can fall and injure yourself as there is a pretty big gap between the first part of the climb towards the official entrance of the cave and the actual entrance, so please be careful when bringing small children and large dogs as well! Unless you are like Captain American and can easily carry heavy weight with one hand! Once you are in the cave, be careful as there are plenty of broken glass inside the cave and an active beehive towards the right entrance that leads to the top of the cave. All in all, it's a great place to enjoy and even rock climb, if you're skilled, and experience the rare caves that exist around the SoCal area.
Hike: 2 miles Parking: Free (on Vanowen) Location: West Hills Trailhead: El Escorpion Park Sign Difficulty: Easy
Hike: 2 miles Parking: Free (on Vanowen) Location: West Hills Trailhead: El Escorpion Park Sign Difficulty: Easy

|

|

|
The Grotto Trail & Leo Carrillo State Beach
The Grotto is located near Malibu in the Santa Monica Mountains. The trail is very short about 3 miles round-a-bout. This hike seems to be more of a stroll in the beginning and is very easy in difficulty. This is a great place to hike if you don't want to experience something strenuous. It is especially magnificent in the early mornings when it is foggy and the air is fresh and cool in addition to the sea breeze. The dry grassy area would be a nice place to have a picnic in during spring or when the grass is green, but please be sure to pick up after yourselves and watch out for Rattlesnakes! Finding the trail was not difficult as there are signs provided, Thank you Park Rangers for looking out for us hikers! Unfortunately we were not able to make it to the Grotto itself because we heard 3-4 rattlers in the dried bushy area adjacent to the trail and feared getting bit or crossing paths with the rattlesnakes, so we turned back and just headed to the beach to relax. Although after doing research, I read that the Grotto trail require a bit of bouldering to get into the cave-like grotto and view the mini waterfall from within the Grotto. From this trail you can see Boney Mountain from behind and is also a trail that is recommended and I have yet to explore.
Hike: 3 miles Parking: Free Location: Malibu Trailhead: Circle X Ranch Difficulty: Easy
Hike: 3 miles Parking: Free Location: Malibu Trailhead: Circle X Ranch Difficulty: Easy

|

|


Monkey Canyon
Located in the Angeles National Forest near Big Tujunga Canyon, lies a beautiful canyon nestled at the bottom of a steep hill. Getting to the Canyon requires a lot of energy as it requires you to maintain your balance by using ropes and helps prevent you from sliding down to the bottom from the landslide-like rocky area or worse fall into a bed of poison oak! It's best to start your journey here early in the morning because once it hits noon, the sun beats straight down into the canyon. A friend of mine shown in the picture had taken us to this beautiful location and advised to check it out during the fall/winter season as the water levels are high up to waist deep. Traversing through the canyon during the summer didn't require wading through the water, but it did make us go bare feet and cross the small streams of water, which might I add, felt very relaxing on a hot day!
Hike: 3 miles Parking: Adventure Pass Location: Big Tujunga Canyon Trailhead: No apparent trailhead Difficulty: Hard
Hike: 3 miles Parking: Adventure Pass Location: Big Tujunga Canyon Trailhead: No apparent trailhead Difficulty: Hard


|


|
